
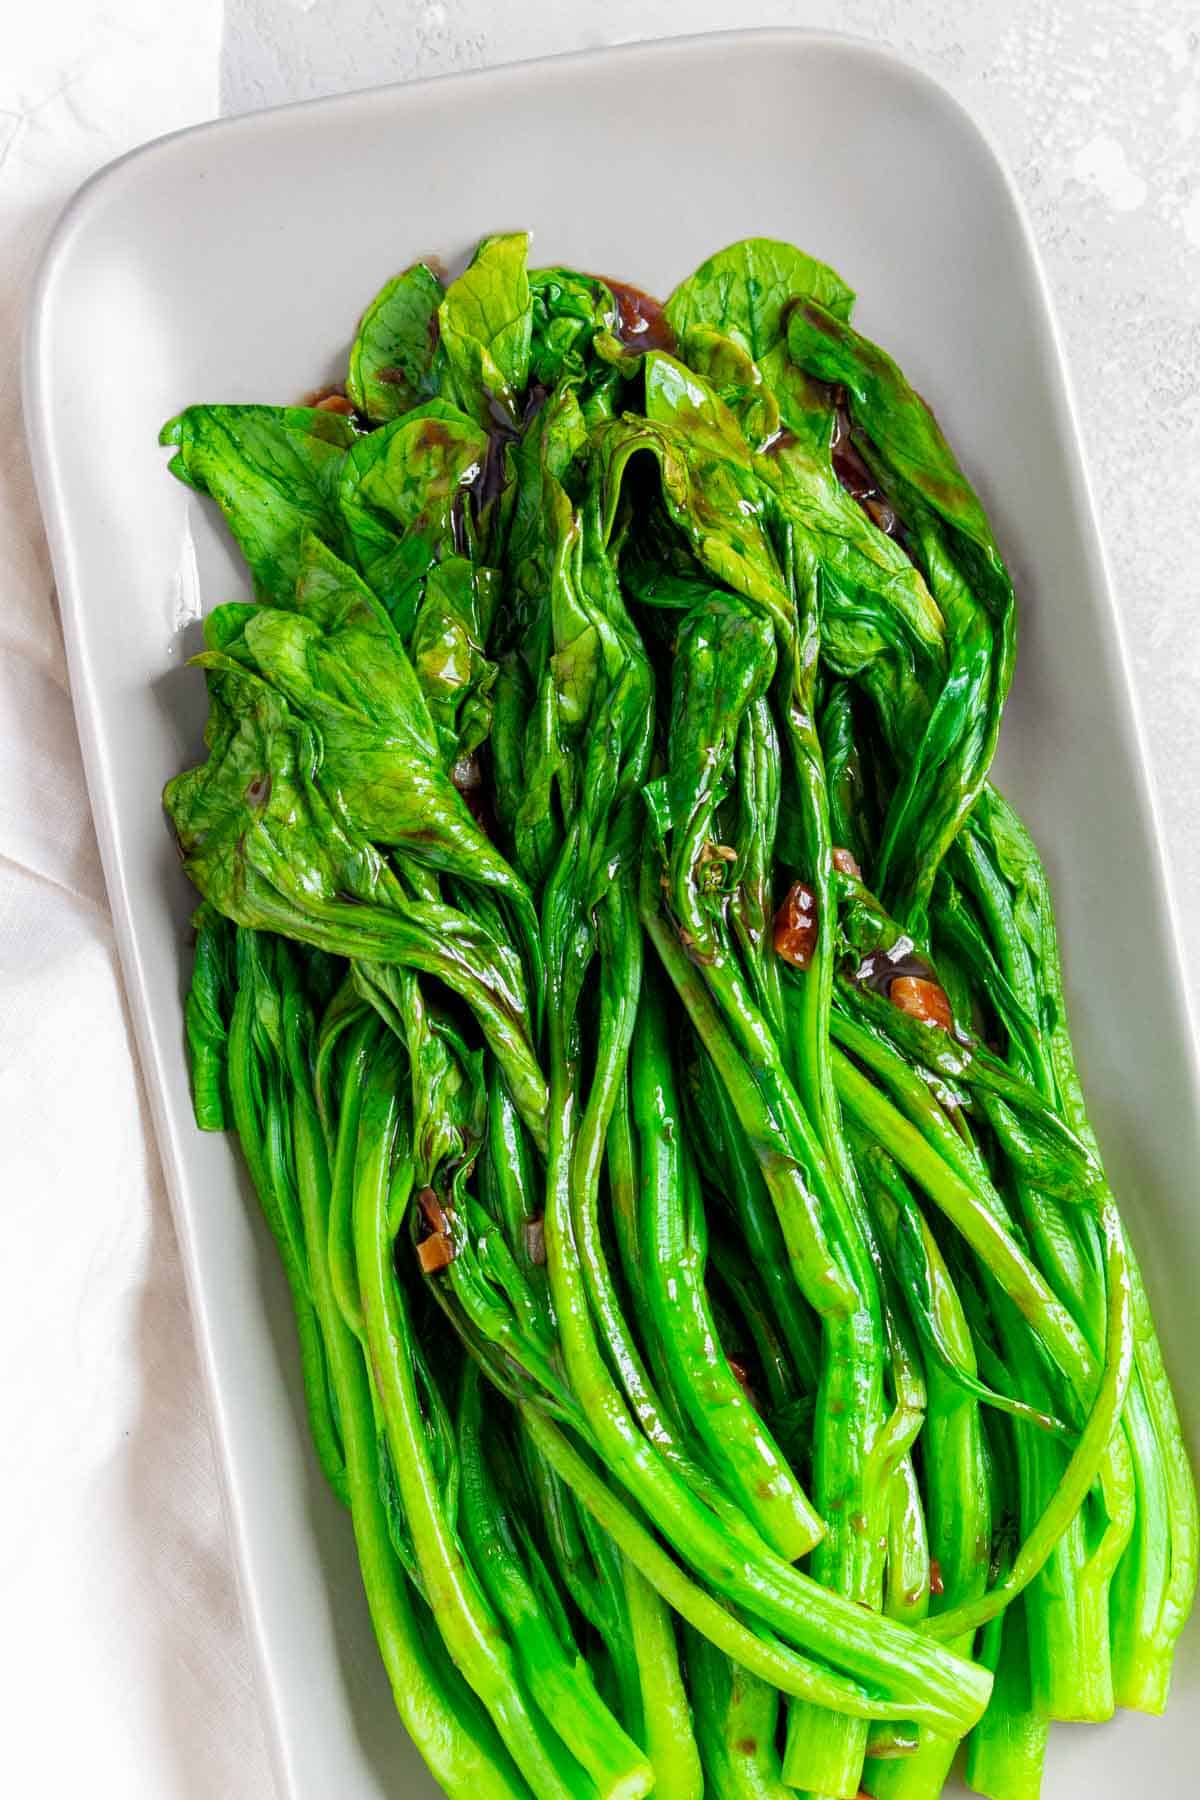
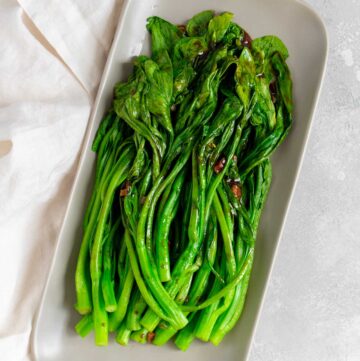
This Chinese Garlic Yu Choy recipe comes together quickly with pantry staples as an easy weeknight side dish. Perfect for any occasion, this side dish is a household favourite that’s served as an everyday side or during celebrations. Made in under 10 minutes, you will have this on the table in the blink of an eye.
Yu Choy (sometimes referred to as choy sum in Cantonese) is leafy green that I feel like I ate once a week growing up. It takes less than 10 minutes to whip up, so it’s the perfect vegetable side dish for a busy weeknight but we also make it for LNY dinner, Reunion Dinner, birthdays, and more. It’s the perfect accompaniment to any meal as it doesn’t overpower your other dishes.
Why You’ll Love This Yu Choy Recipe
- This is healthy right? LOL. I like to believe that it’s a healthy side dish as it’s essentially just a Chinese leafy green vegetable with some savoury sauce on top. It’s hard to make this unhealthy!
- It’s really easy to make. All you have to do is mix a few pantry staples together in a small saucepan and blanch the yu choy for a couple of minutes and you’ve got this side dish ready to eat. It’s our go-to because it takes next to no time to make.
- The ways to customize yu choy is endless! If you want to make this spicier, add some sriracha. Love garlic like I do? Add more garlic! Want a nuttier flavour? Add more sesame oil. Want it sweeter? A drizzle of honey.
Ingredients You’ll Need
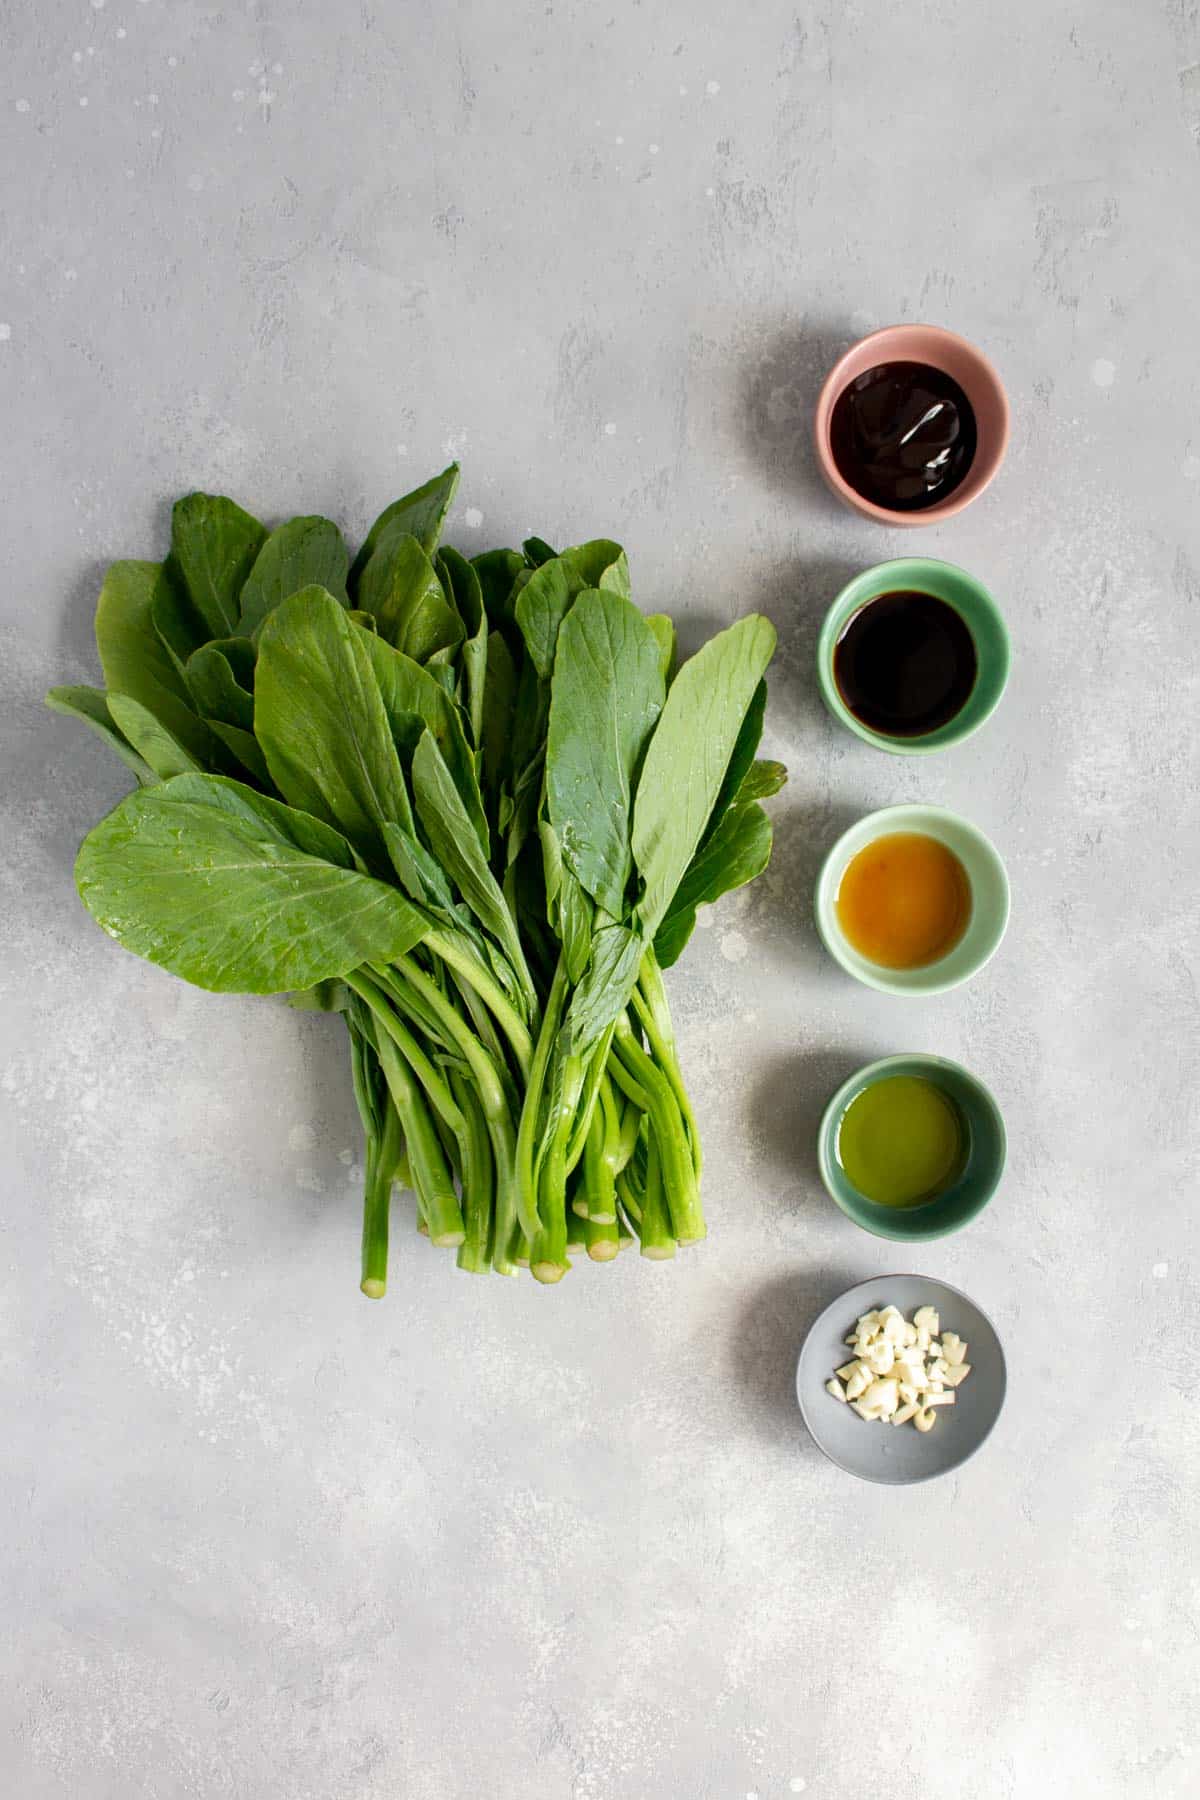
- yu choy — growing up, we would get our yu choy from Chinatown. Now, I’ve noticed grocers such as Farm Boy and Loblaws carry them regularly! So you should be able to find them at your local grocery store.
- oil — use a neutral oil to cook your garlic in. I usually just use olive oil since it’s always within reach of the oven.
- garlic — honestly, the more garlic, the better. Add to your heart’s desire.
- soy sauce — use low sodium soy sauce so the choy doesn’t taste too salty.
- sesame oil — I use pure sesame oil.
- oyster sauce — don’t worry, while it’s made from oyster extract, it doesn’t taste like oysters! You can also use a vegetarian version. Check out my post on what is oyster sauce for more info.
- salt — to salt the water that the yu choy is blanched in.
How to Cook Yu Choy
- Wash the yu choy thoroughly to remove any dirt or debris.
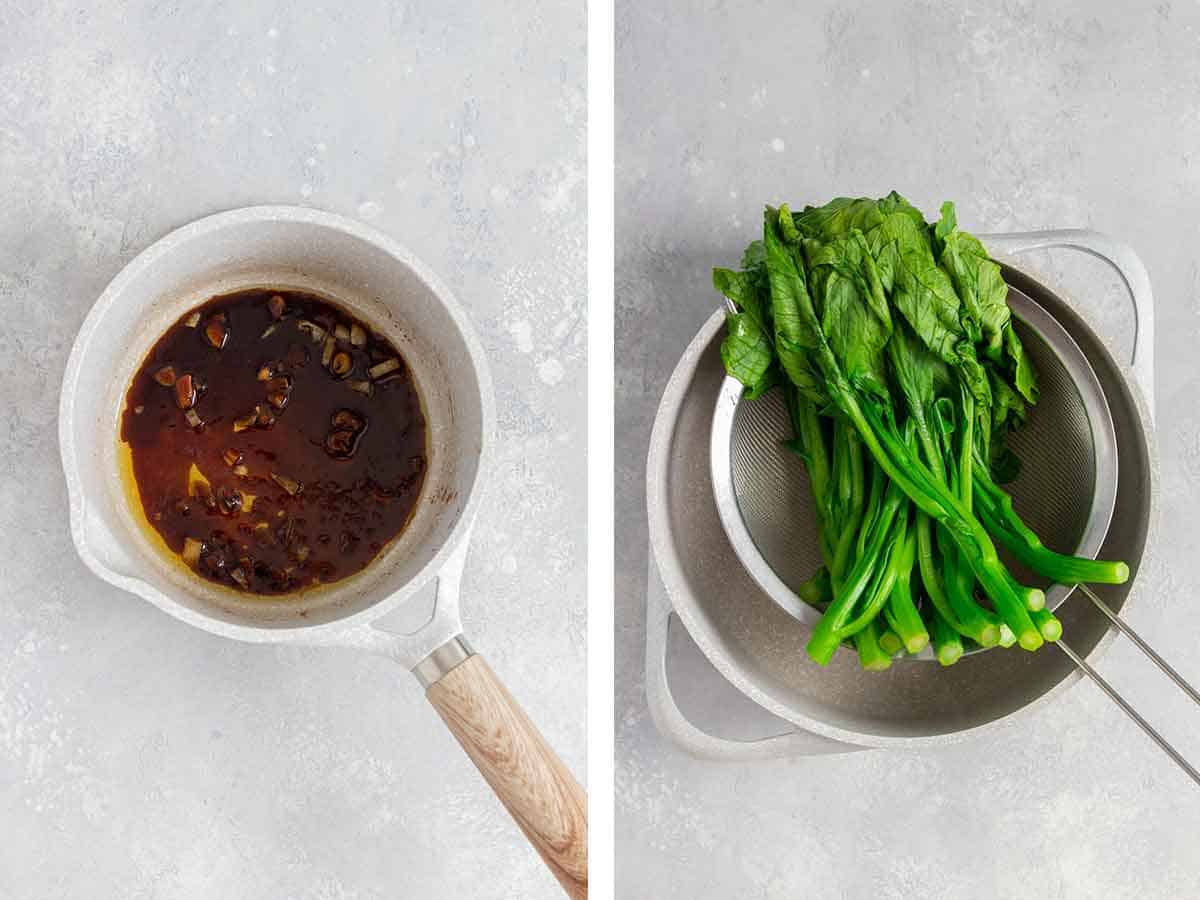
- In a small saucepan, heat up the oil over medium-heat. Once hot, add the garlic and stir until the garlic is fragrant. About 2 minutes. Then, add the soy sauce, sesame oil, and oyster sauce. Stir to combine and once it has come up to a boil, remove it from the heat and set aside.
- Meanwhile, bring a pot of salted water to a boil. Then, add the yu choy to the water and blanch for 2 minutes. Drain and place the choy on a serving platter or large plate.
- Drizzle the sauce over the yu choy and gently toss to combine. Serve immediately.

Recipe Tips and Notes
- I like to roughly chop my garlic instead of mincing finely for this recipe. This way, the garlic doesn’t burn in the oil and you get delicious tender bits of garlic throughout the choy.
- Make sure to give the yu choy a thorough rinse before cooking with it. Sometimes there’s debris caught in the choy.
- If the yu choy is too long, feel free to simply cut them in half, lengthwise.
- There will be minor splattering when you add soy sauce to the hot oil. Be careful!
Make Ahead Tips
- Meal prep: once cooled, store the cooked yu choy an airtight container for up to 4 days in the fridge.
- Reheating: sometimes I eat leftovers straight from the fridge. If you prefer it to be warmed, you can warm it in the microwave or stir fry it for a few minutes.
- Freezer: I don’t recommend freezing this.
Yu Choy
Ingredients
- 500 grams yu choy
- 2 tablespoons oil
- 2-3 cloves garlic, roughly chopped
- 1½ tablespoons oyster sauce
- 1 tablespoon soy sauce, low sodium
- ½ tablespoon sesame oil
Equipment
- Large skillet
Instructions
- Wash the yu choy thoroughly to remove any dirt or debris.
- In a small saucepan, heat up the oil over medium heat. Once hot, add the garlic and stir until the garlic is fragrant. About 2 minutes. Then, add the soy sauce, sesame oil, and oyster sauce. Stir to combine and once it has come up to a boil, remove it from the heat and set aside.
- Meanwhile, bring a pot of salted water to a boil. Then, add the yu choy to the water and blanch for 2 minutes. Drain and place the choy on a serving platter or large plate.
- Drizzle the sauce over the yu choy and gently toss to combine. Serve immediately.
Nutrition Per Serving
More Side Dishes to Try
- Seasoned Spinach
- Korean Cheese Corn
- Mayak Eggs
- Brussels Sprouts and Carrots
- Korean Potato Salad (Gamja Salad)
- Japanese Corn Rice
- Pajeon
Other places to connect with me
@carmyshungry on Instagram
Facebook
Shop my Amazon faves
Email: [email protected]
Leave a Reply