
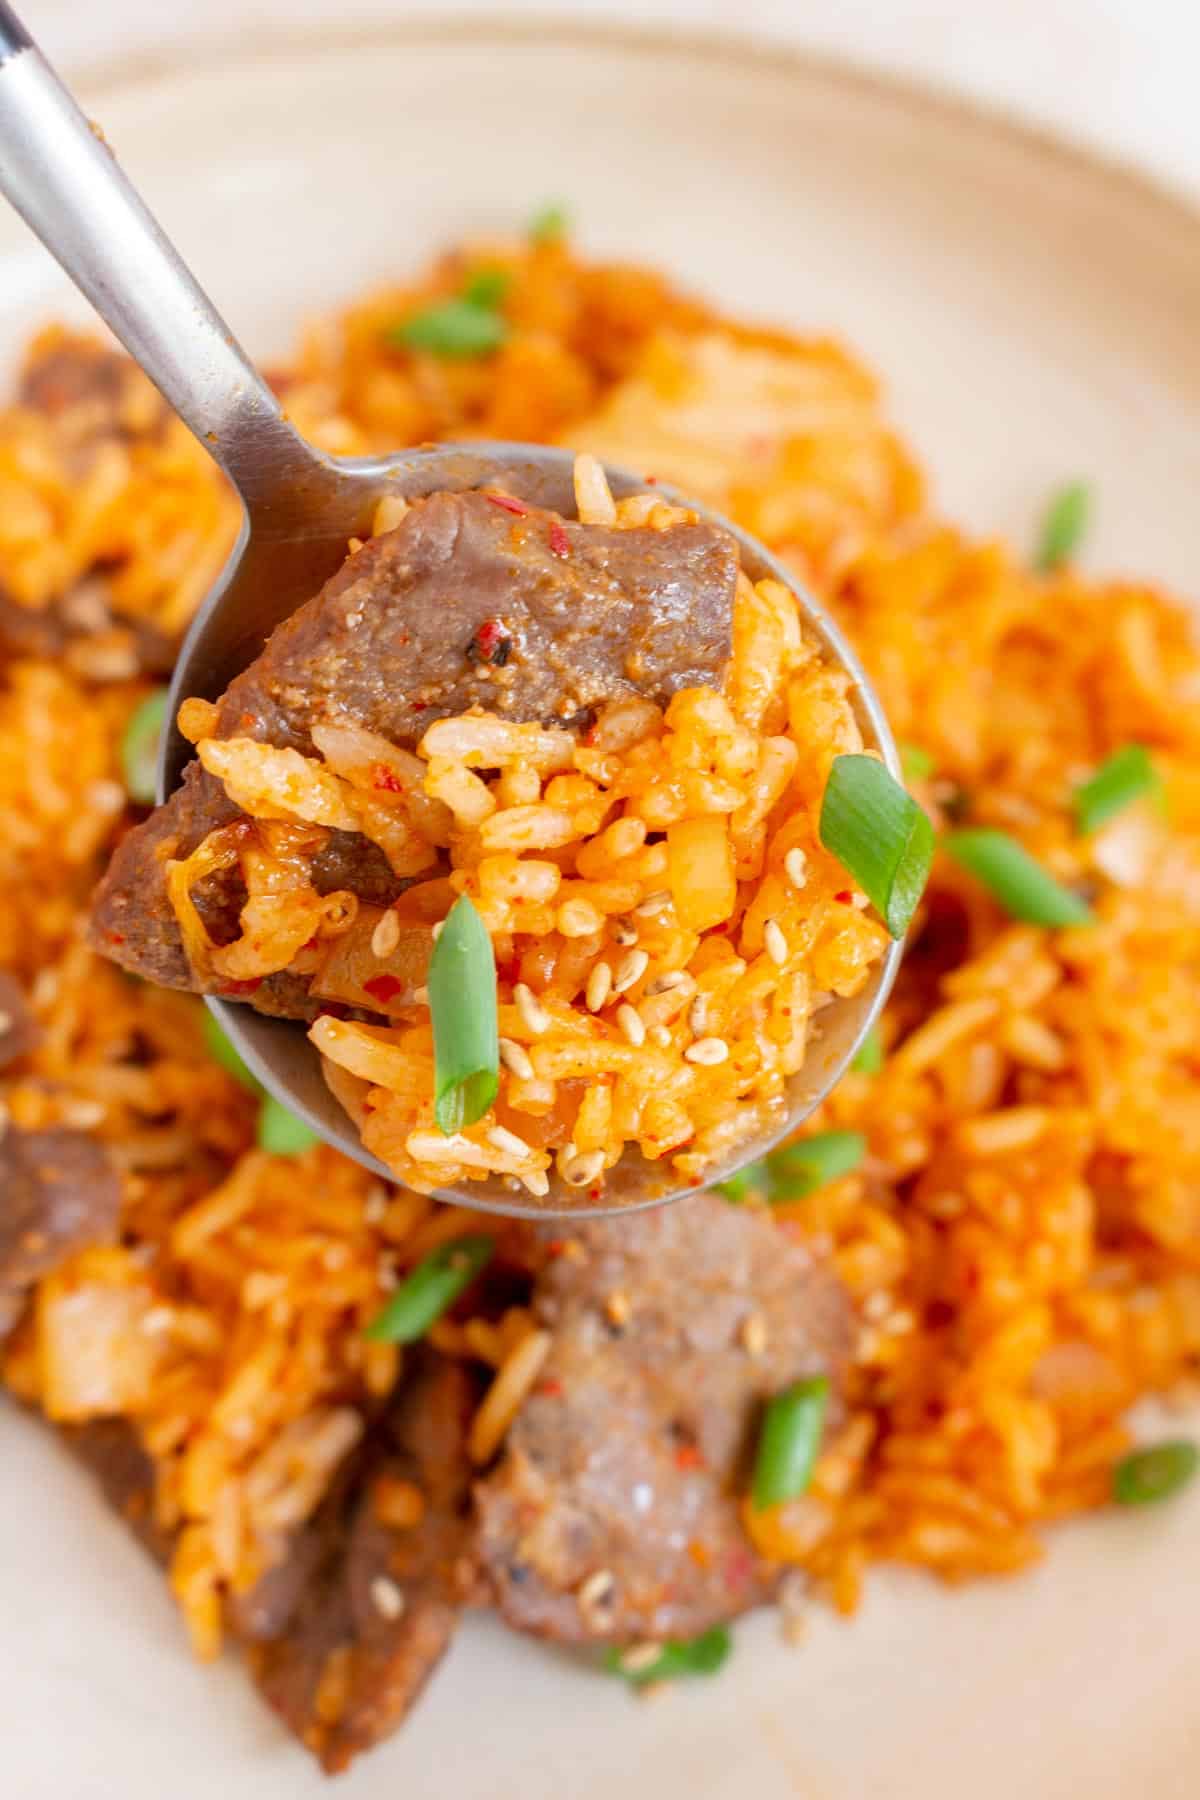
Comforting and flavorful, this gochujang fried rice recipe is the perfect weeknight meal. Loaded with beef, kimchi, rice, and gochujang, this hearty fried rice recipe is so satisfying. This simple fried rice recipe is also a great way to use up leftover rice!
If you want an easy weeknight meal, this gochujang fried rice is a hearty option that you can whip up in a flash. It’s simple, delicious, and a great use of leftover rice.
Why You’ll Love This Recipe
- It’s a hearty dish! Its got beef, kimchi, and rice. You can add additional vegetables to this as well to bulk it up even more. It’s very easy to customize.
- It’s the perfect balance of spicy and savory. I am obsessed.
- It keeps really well, so leftovers make for a great meal prep!
Ingredients You’ll Need
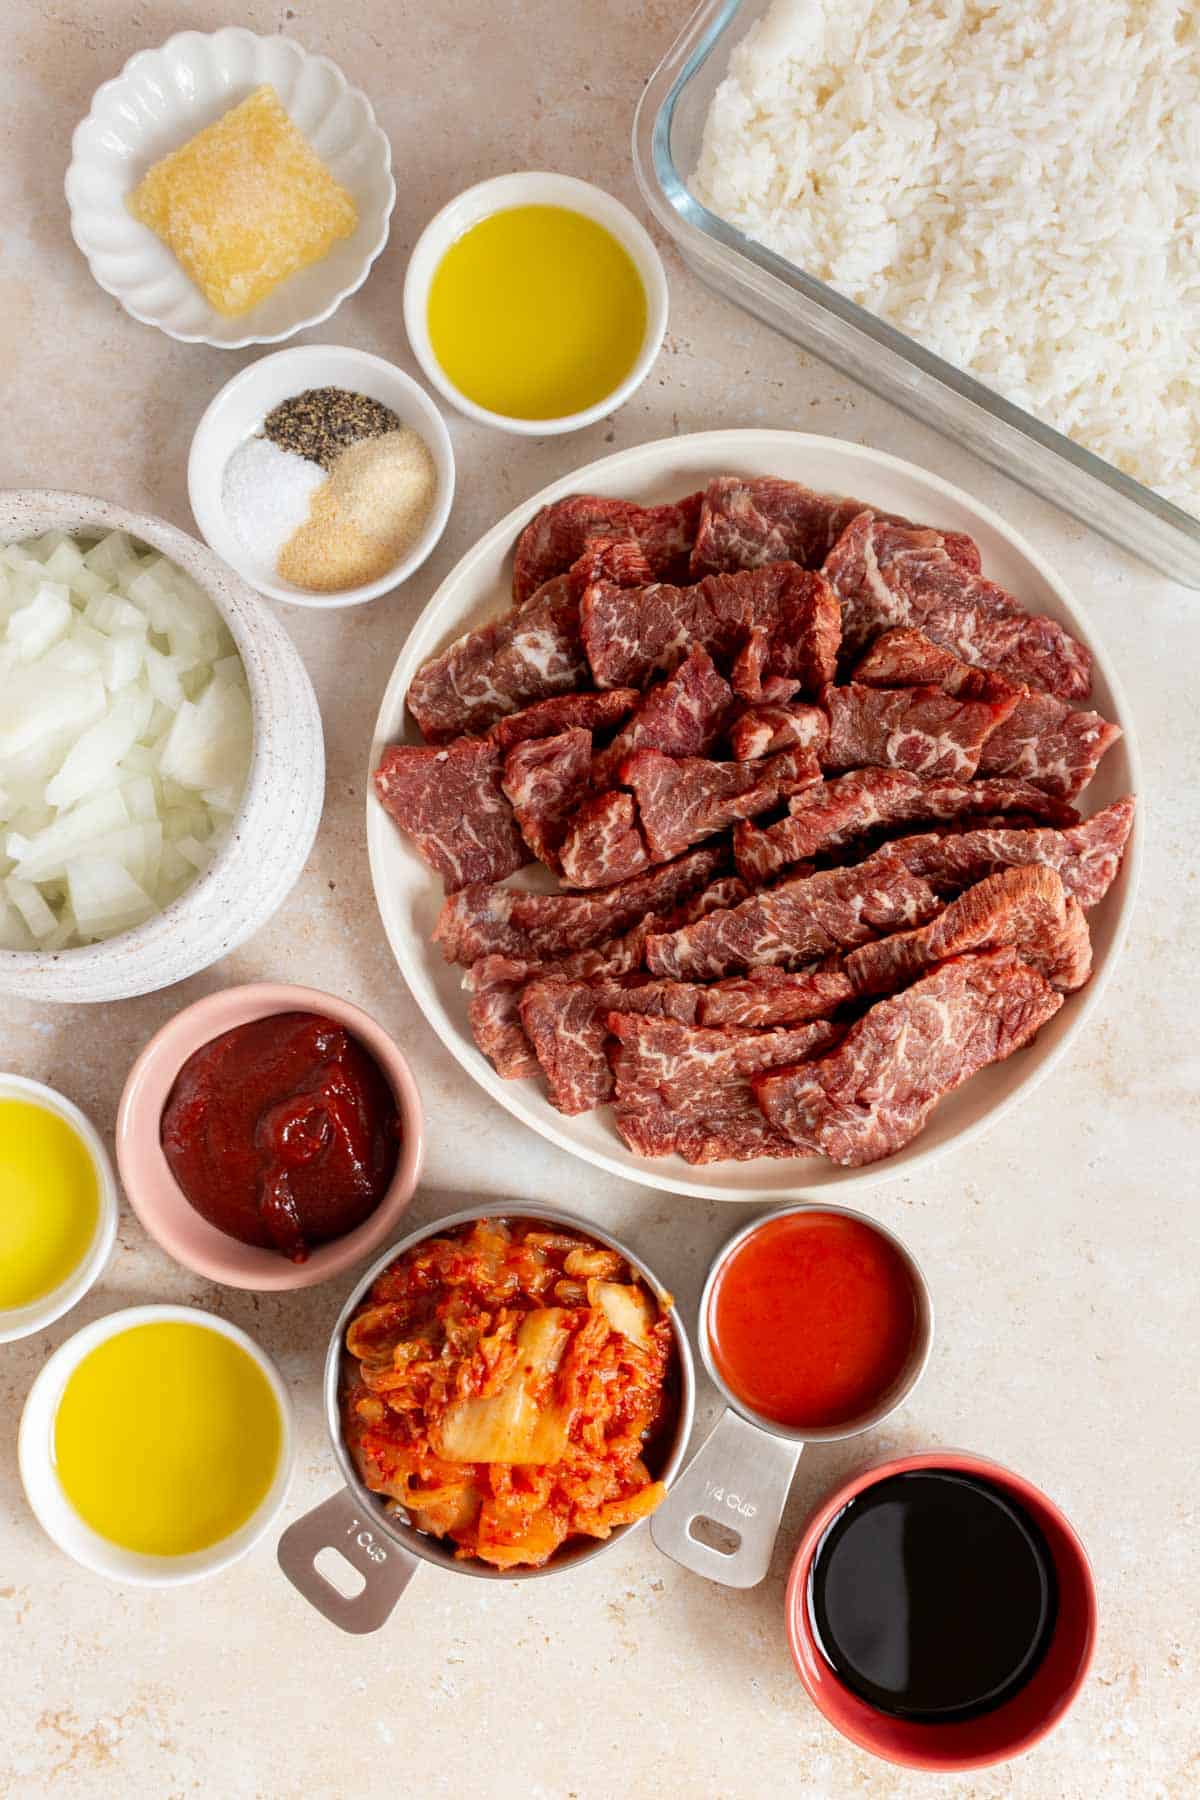
- beef — I picked up some wonderful pre-sliced Angus beef bottom sirloin on sale. You can use any sliced beef. I’ve made this with sliced flank steak as well.
- oil — I use olive oil but you can use any neutral oil for cooking.
- seasoning — I use a combination of salt, pepper, onion powder, and garlic powder to season the beef.
- onion — a small to medium-sized onion is fine for this fried rice recipe.
- kimchi — you’ll need kimchi along with the juice that’s in the bottle of kimchi.
- garlic — the more, the merrier. See how I process and freeze minced garlic, so I always have some on hand without having to mince garlic for every recipe.
- gochujang — aka Korean red chili pepper paste. You can’t skip the gochujang for the gochujang fried rice. Please do not substitute this ingredient. Keep in mind that gochujang comes in different levels of spiciness. You can get the super spicy or mild one, depending on your preference.
- soy sauce — I use low sodium soy sauce.
- leftover cooked rice — I always use jasmine rice. Chilled leftover rice is ideal as cold rice is firmer and decreases the chances of your fried rice turning out mushy.
How to Make Gochujang Fried Rice

- Add the beef to a bowl or a plate and toss to coat with 1 tablespoon of olive oil and the salt, pepper, onion powder, and garlic powder.
- Add ½ tablespoon of oil to a skillet over medium-high heat, and once the pan is hot, add the beef in a single layer. Leave the beef untouched for a minute (or more if your beef is thicker), and then flip. Allow the beef to cook through and set aside.

- Add 1 tablespoon of oil to the skillet and once it’s hot again, add the diced onion. Saute the onions for a minute before adding the kimchi and garlic. Saute for another minute.
- Add the kimchi juice, gochujang, and soy sauce to the skillet and cook for another minute, making sure everything is well combined.
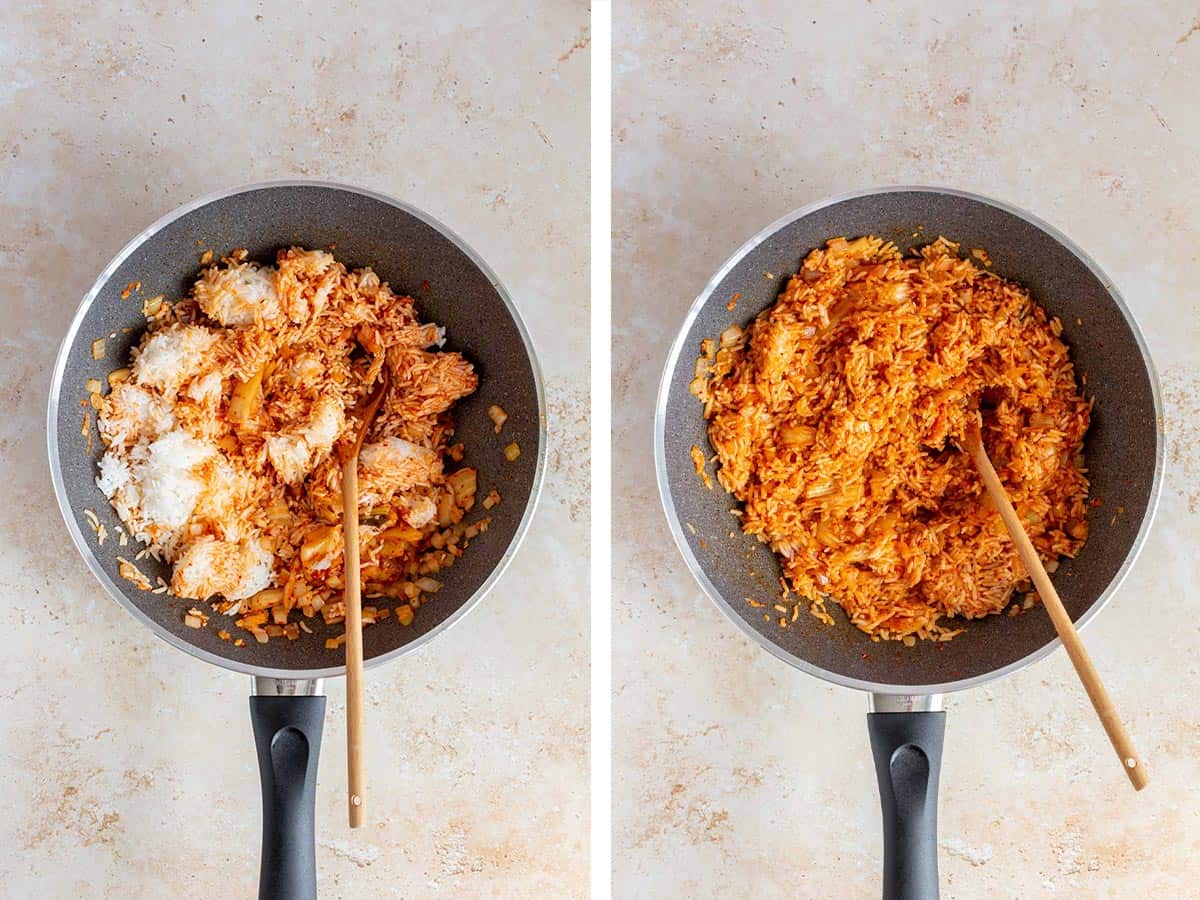
- Add the cold rice to the skillet and toss to combine. Cook for two to three minutes or until the rice is hot.
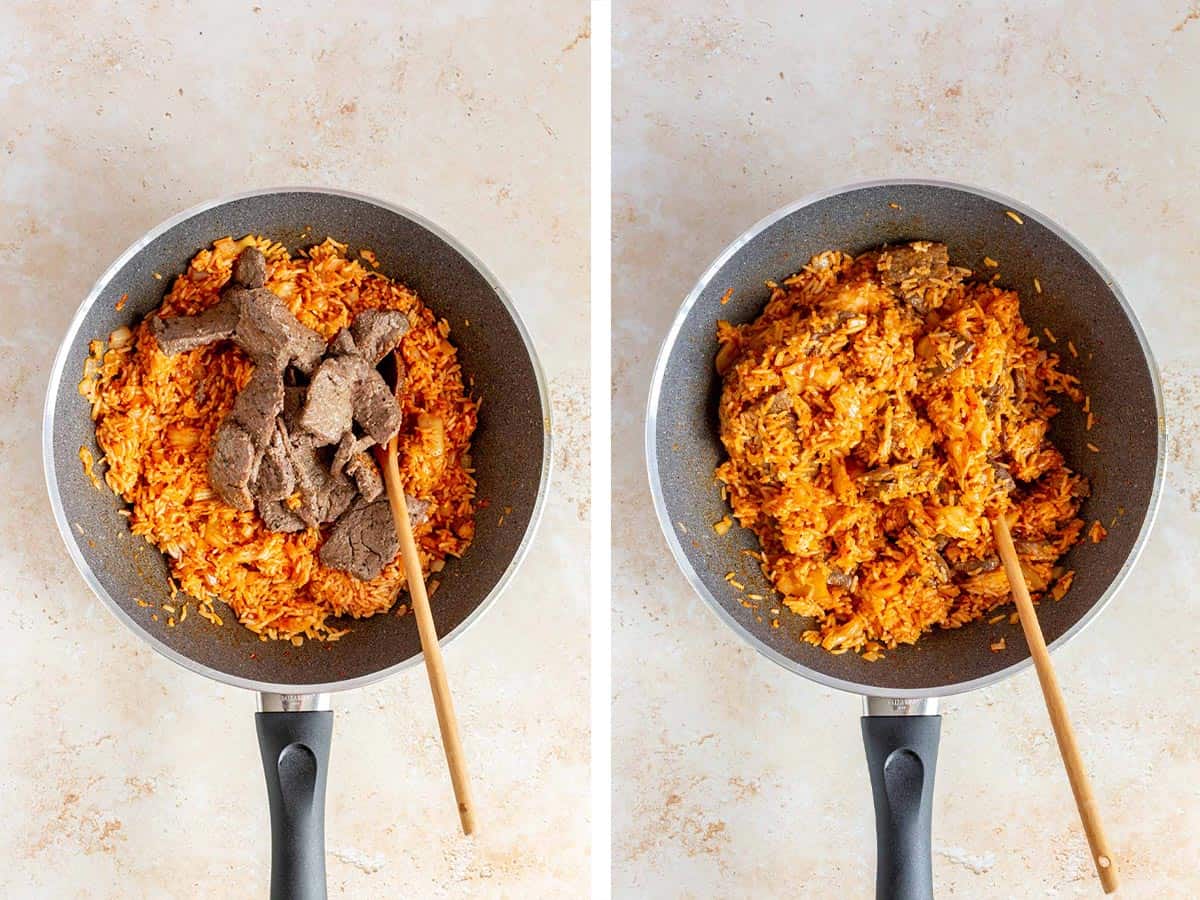
- Add the beef back to the skillet and toss to combine.
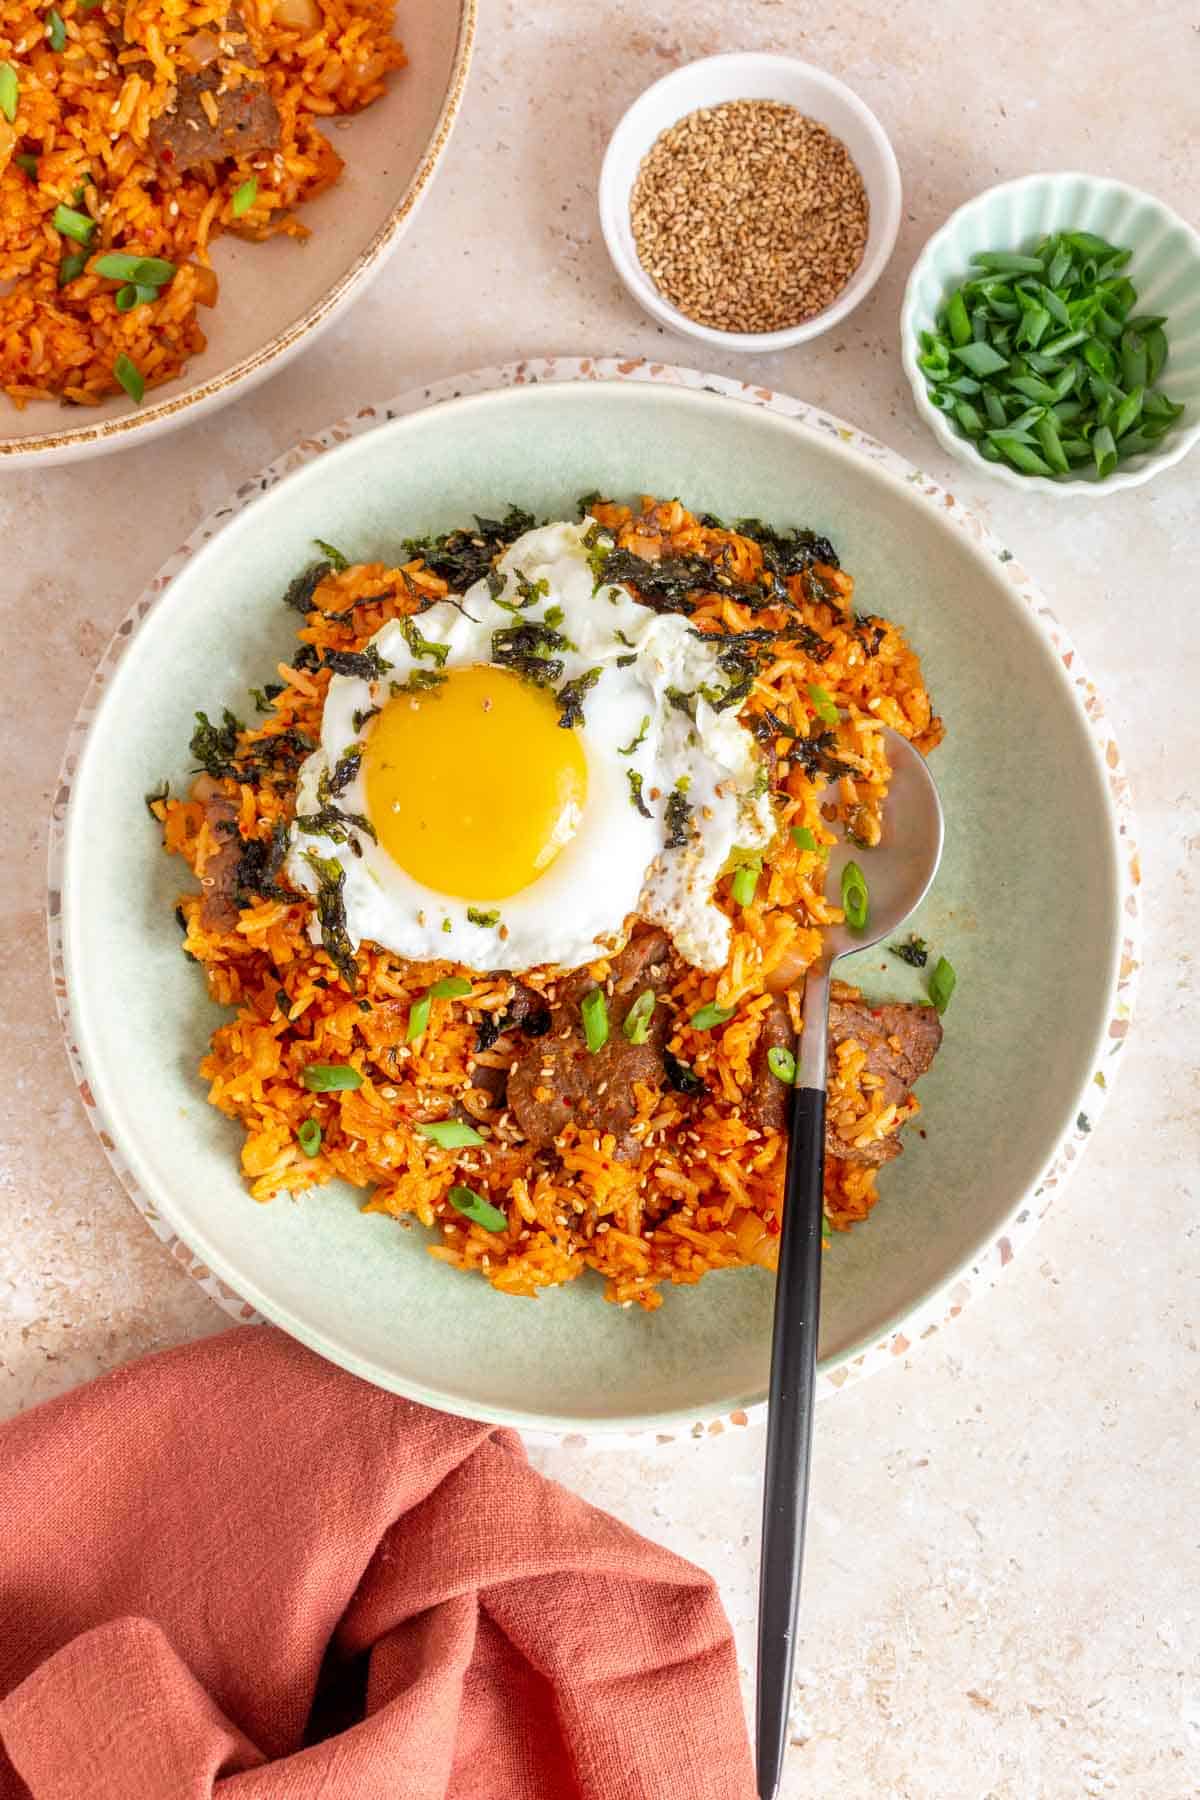
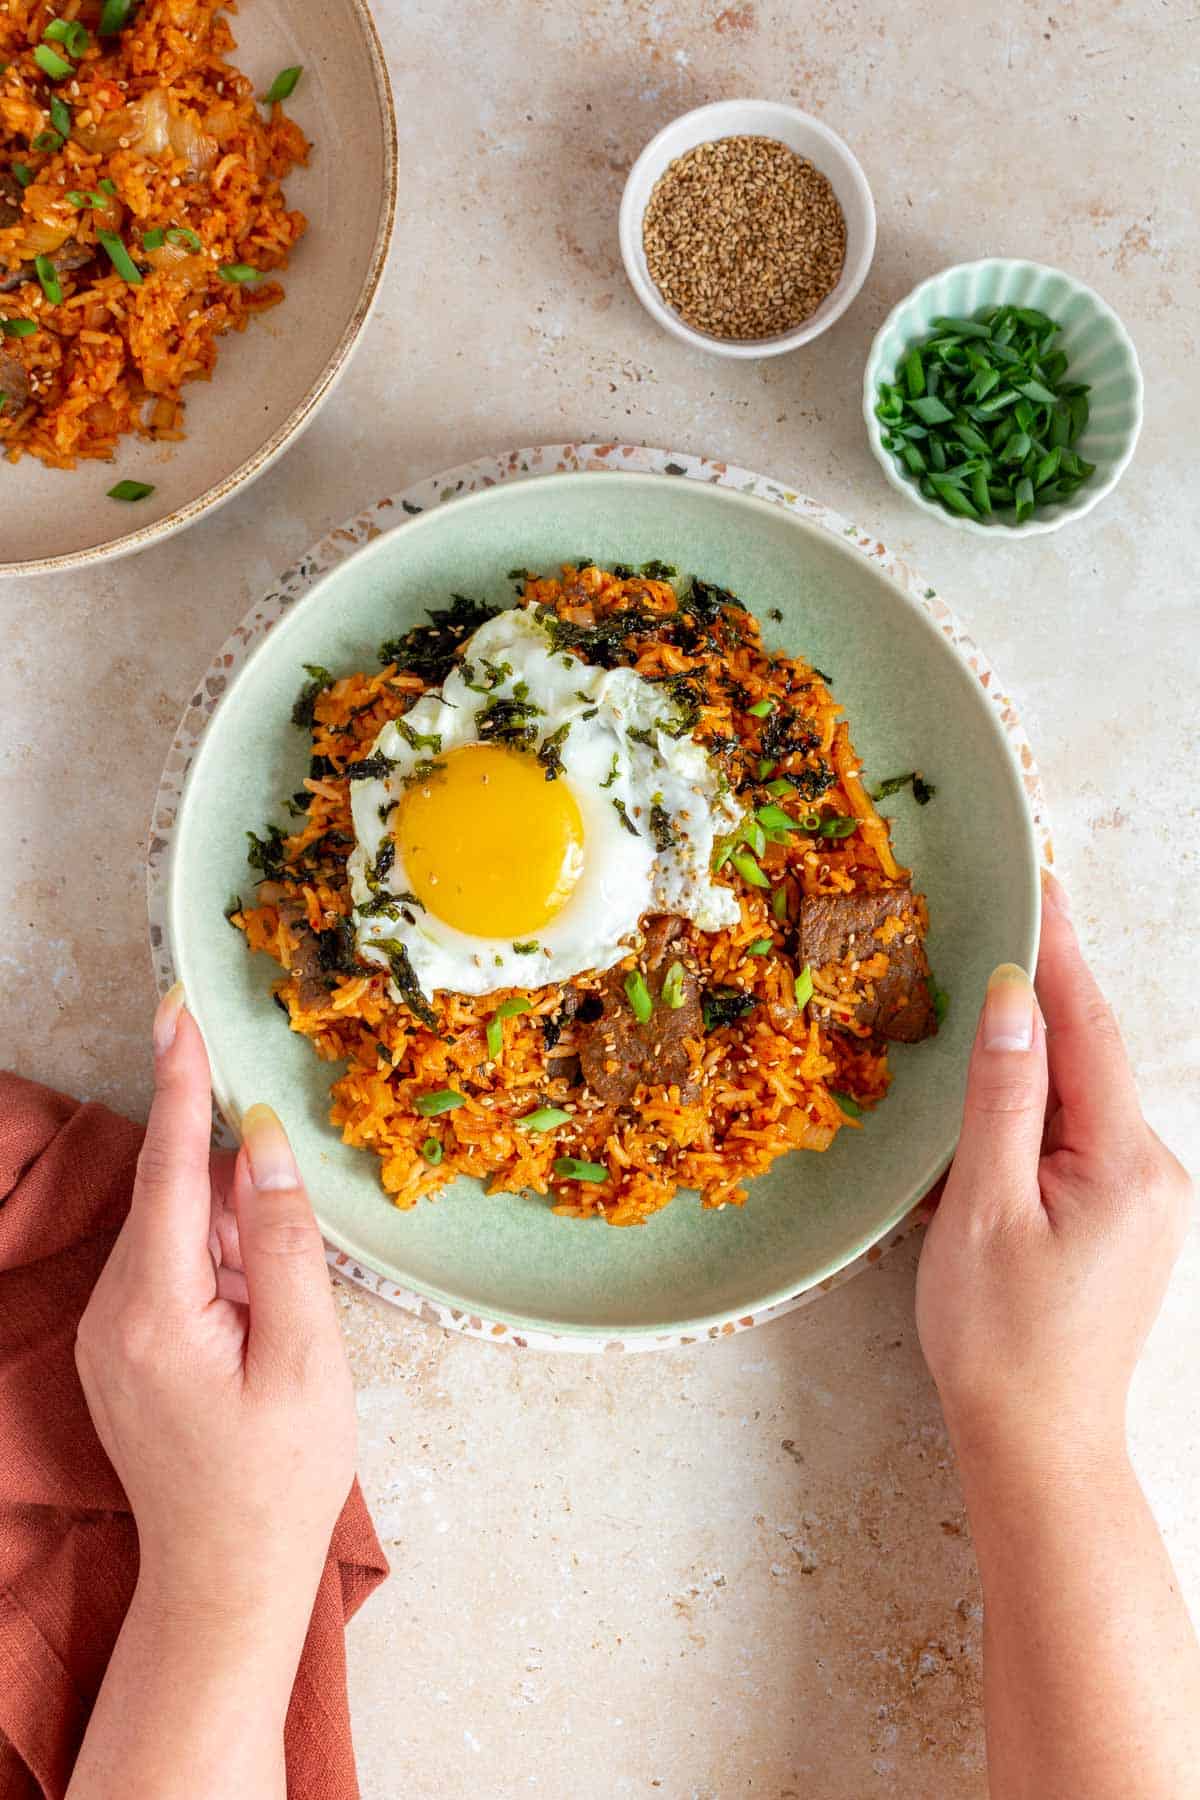
- Serve as is or garnish with green onions.
Recipe Tips and Notes
- If you’re a fan of crispy rice, you can press the rice down into the skillet and leave it untouched for a couple of minutes and allow the rice to crisp up.
- If you have a rice cooker, you can change the setting to make slightly “harder” rice when you cook it the night before. It’ll help the rice grains hold their shape better when you use it for fried rice. (Here’s a review of the rice cooker I have).
- Optional: for some extra veggies, you can add a handful of frozen peas, shredded carrots, diced bell peppers, edamame, and more!
- I enjoy adding extra sesame seeds, shredded seaweed, and a fried egg on top of my gochujang fried rice.
- If you do not have sliced beef, this recipe works well with ground beef as well. You can also use shabu shabu beef.
- You can double the amount of beef in this recipe to make it more hearty.
Make Ahead Tips
- Meal prep: once cooled, store the cooled gochujang fried rice in an airtight container for up to 4 days in the fridge.
- Freezer: allow the fried rice to cool before transferring into an airtight container and storing them in the freezer. Frozen fried rice can last for up to 3 months.
I always use cold leftover rice from the fridge overnight as it has had the chance to firm up. Using cold rice makes it easier to separate when frying and decreases the chances of your fried rice turning out mushy. I’ve tried making fried rice with freshly cooked rice before and it gets sticky and mushy quickly. I always make my rice the day before. If you don’t have leftover rice, you can try to prepare the rice beforehand and then spread it out on a sheet pan so it can cool quickly in the fridge for an hour or so.

Gochujang Fried Rice
Ingredients
- ½ pound sliced beef, or more
- 1 tablespoon olive oil, for coating the beef
- ¼ teaspoon salt
- ¼ teaspoon pepper
- ½ teaspoon onion powder
- ½ teaspoon garlic powder
- ½ tablespoon oil, to cook the beef
- 1 tablespoon oil, to cook the fried rice
- 1 medium onion, diced
- 1 cup kimchi
- ¼ cup kimchi juice
- 1 tablespoon minced garlic
- 2 tablespoons gochujang
- 3 tablespoons soy sauce, low sodium
- 4½ cup cold cooked rice
Instructions
- Add the beef to a bowl or a plate and toss to coat with 1 tablespoon of olive oil and the salt, pepper, onion powder, and garlic powder.
- Add ½ tablespoon of oil to a skillet over medium-high heat, and once the pan is hot, add the beef in a single layer. Leave the beef untouched for a minute (or more if your beef is thicker), and then flip. Allow the beef to cook through and set aside.
- Add 1 tablespoon of oil to the skillet and once it’s hot again, add the diced onion. Saute the onions for a minute before adding the kimchi and garlic. Saute for another minute.
- Add the kimchi juice, gochujang, and soy sauce to the skillet and cook for another minute.
- Add the cold rice to the skillet and toss to combine. Cook for two to three minutes or until the rice is hot.
- Add the beef back to the skillet and toss to combine.
- Serve as is or garnish with green onions.
Nutrition Per Serving
More Fried Rice Recipes to Try
- Ketchup Fried Rice
- Japanese Fried Rice
- Hibachi Fried Rice
- Sriracha Fried Rice
- Beef Fried Rice with Fried Egg
- Tuna Kimchi Fried Rice
Other places to connect with me
@carmyshungry on Instagram
Facebook
Shop my Amazon faves
Email: [email protected]
Leave a Reply